Showing posts with label Engineering. Show all posts

Friday, June 26, 2020

Big Box Play Product Review


Big Box Play sent us their castle set in exchange for a review.

Do you ever wish that you could spend thirty minutes doing a great activity with your kids, then get back to your own work, and they’d still be engaged?

Wouldn’t it be great to find a project that’s big enough to take your children’s attention for several hours? Maybe a couple of days? STEM projects are usually winners in the interest department, but it’s frustrating that we parents usually end up being the ones actually doing the project after the kids wander off.


STEM Play

Friday, April 14, 2017

How you can make a toy boat that really floats

These toy boats really float, and would be perfect for a preschool unit, or high school science experiments in buoyancy.

The other day I wanted a couple of quick, cheap toy boats that would float. We were headed out out to our favorite puddle. Both of my little ones LOVE stomping back and forth through the puddle, and I love that their naps usually happen in a timely manner afterward.  However, our last puddle day had ended with swimming, and it's still a little chilly for that, even here in Alabama. So,to encourage wading in the puddle, I made a quick toy.


These easy to make bottle boats are the perfect toy for Earth day, my preschoolers loved them


When we lived in an apartment and weren't fortunate to own our own puddle, I'd put my children in their bathing suits, and let them play in the bath on rainy days. These boats would work great there too!

Thursday, February 9, 2017

Cool Minecraft STEM learning project

Learn some math and engineering while playing your favorite video game. This post is not officially sponsored by Minecraft.

"Mom, thank you!" My son threw his long arms around me.

Interfering in my children's plans for playing their favorite video games doesn't always go this well. Like most tech loving families we have really struggle with how to make technology a positive part of our family's routines.


Cool Minecraft STEM learning project


Sunday, January 22, 2017

Fun simple machine project that anyone can teach

Use every day materials to teach basic engineering concepts with this fun home made toy. 


This fun, cheap DIY toy is the perfect way to introduce engineering to your kids!


Today we have an awesome guest post from Christy at Engineer to Stay at Home Mom. If you haven't tried making home made toys before, this would be a great first project, and I love how she connects science objectives to real life.


Friday, January 13, 2017

How to set up an Environmental Engineering challenge in Minecraft

Give your child and environment engineering challenge to fulfill on their favorite video game. This challenge is aligned with NGSS standard K-ESS3-1: Use a model to represent the relationship between needs of different plants and animals and the environment in which they live. This challenge is not affiliated with Minecraft.


You can encourage your child to build her science and engineering skills with this fun environmental challenge for Minecraft.


 After a generous two week vacation, my children were getting a little bored. Then, after going to back to school for exactly one day, my children were treated to a snow day.

Friday, July 22, 2016

How to get a box of amazing hands-on science projects sent your door

"You haven't given your kids a chance to be bored!" My mom's assessment of our summer schedule reflects my own feelings, but I don't think my children would agree. No one wants the school schedule back, but they could handle a little excitement, and even some learning. The summer chaos has already doubled my work load in the kitchen and the laundry room. Planning great activities is tough. Can you relate? If so, I have the perfect solution for you today.


Do you ever wish someone would just put together four or five science projects, and box up everything you need and send it to your house?


Wednesday, February 3, 2016

Kids Engineering:Valentines Heart Bombs!

T-Rex (my second grade son) has come up with another fun engineering project for you. This time, we're making heart bombs- just in time for Valentine's Day.


Here's a fun way to study electrostatics or spend a Saturday morning in Februrary.


Thursday, January 14, 2016

How to do a Lego Engineering Project for Second Grade


Here's a beginner Lego engineering project that's fun enough to do at home, and aligned to NGSS standards for school.


"That's so cool. I have to tell Mom!" Over hearing that phrase makes any winter break project a winner on its own, but this LEGO engineering project was also super easy and covers NGSS standard k-2ETS1-2

"Develop a simple sketch, drawing, or physical model to illustrate how the shape of an objec helps it function as needed to solve a given problem."

Wednesday, November 25, 2015

How to Use an Obstacle Course to Give Thanks


How to Give Thanks with an Obstacle Course


"We need to hang a pumpkin from the tree."  On a recent bright fall day we had some friends visit. They kindly brought us lunch, and T-Rex was excited to set up this Thanksgiving obstacle course our friends to try. Of course a hanging pumpkin was high on his list of obstacles.

Thursday, February 12, 2015

Messy Fort: A Simple Strategy for Making Any Day Special

Building a fort is great engineering practice that helps kids learn physics and  develop their creativity. When I saw the Fort a Building Challenge from Building Blocks and Acorns I knew it was a project for us. However, it did not go as expected.  

After a fun day, that ended up having nothing to do with forts, some illness, and some general disruption of this mother's plans, I finally resorted to just making the fort myself on a random day. After all, setting the example is one of the most important aspects of involving kids in STEM, right?

Here is a fun way to make an ordinary day special.  Check out this DIY fort where kids can do art, eat, and even do their home work.


Materials for this Messy Fort


Foam Mats
Tarp
Dining Room Chairs
Sheet
Twisty Ties

How to Set Up a Messy Fort


I chose this spot in our dining area, because I wanted natural light pouring into our fort so that it would be good for art.  We had already lined the windows with painters tape.


Here is a fun way to make an ordinary day special. Check out this DIY fort where kids can do art, eat, even do their home work.

I put down the foam mats to protect the floor and make a comfortable place to sit .

Here is a fun way to make an ordinary day special. Check out this DIY fort where kids can do art, eat, even do their home work.

The mats were covered with a tarp for added protection.  I wanted to be sure the kids really had the chance to get messy!

Next, I arranged four chairs on the edge of the tarp.

Here is a fun way to make an ordinary day special. Check out this DIY fort where kids can do art, eat, even do their home work.

Finally, I topped it all with a bed sheet, and fastened the corners with twisty ties.

Here is a fun way to make an ordinary day special. Check out this DIY fort where kids can do art, eat, even do their home work.

How We Enjoyed our Messy Fort


My preschooler was the first one to use the messy fort .  She loved being able to play with play dough on the ground.  I do not normally allow that.  She made some shape patterns and did an experiment by mixing two types of play dough.


Here is a fun way to make an ordinary day special. Check out this DIY fort where kids can do art, eat, even do their home work.

Next, I set up a special sensory play for my toddler.  I mixed up some bubbles with the dish soap, and put them in a pot.

Here is a fun way to make an ordinary day special. Check out this DIY fort where kids can do art, eat, even do their home work.

She enjoyed exploring and squishing the suds between her fingers. Sensory play is science for babies!

Here is a fun way to make an ordinary day special. Check out this DIY fort where kids can do art, eat, even do their home work.

When my oldest got home from school, he was excited to get on on the action.  He ate his snack in the fort, then he used water colors to practice his spelling words and do some art.

Here is a fun way to make an ordinary day special. Check out this DIY fort where kids can do art, eat, even do their home work.

Some times, rather than adding a new activity, we just need to liven up the ordinary tasks. My children loved that they had a special place to enjoy their normal activities.  We enjoyed our messy fort, and I am looking forward to many more forts to come.

How do you like to liven up ordinary days?


There have been some great forts done as part of this fort building challenge including, an ocean fort, an outdoor fort, and a space fort.  All great science themes!  It is not too late to get in on the fun.  Check out the Fort Building Challenge homepage, build your own fort, and even send in a picture.


You May Also Enjoy:

The Surprising Truth About Why Your Child Makes So Many Messes


I Spy: Rot! An Effortless Science Lesson


Tuesday, February 10, 2015

Fine Motor Engine Play for Kids who love Planes, Cars, and Trains

My son requested a Planes themed party.   This year we did a big party, so I wanted an open ended free play activity to start the party and fill in the time gaps. We ended up with a nice fine motor exercise.  Since this activity features real things from the hardware store, it naturally drew the children's interest and they enjoyed engineering some great works of art.


Kids who love planes, trucks, cars, and planes will enjoy this fine motor play.

This activity was designed for first graders and kept out of reach of the toddler.  Please be aware that the small pieces present a choking hazard, and make a wise decision for your family.

Materials for Motor Themed Fine Motor Play


3/4 inch Bolts
3/4 inch Nuts
3/4 inch Washers
Red Yarn
Dark Yarn
Round Magnets
Peg board

The peg board was my sister's idea.  I always appreciate how she buys into my crazy ideas and helps me finish them.  I asked to have it cut into one foot squares at the store.  Everything else, except the yarn can be found in the hardware aisle.


This play set was easy to put together, and a big hit with my kids!

I literally just put the materials on the table and let the kids go at it.  Some of them did pretend to wire an engine.

This play set was easy to put together, and a big hit with my kids!


Others worked on filling as many holes as possible with bolts, or fastening boards together.


This play set was easy to put together, and a big hit with my kids!

My own children played with these for a couple more weeks.  My daughter even refined her design because, her previous design was "not safe, because the wires were hanging down."  Yay for thinking like an engineer!

This play set was easy to put together, and a big hit with my kids!

If you have a mechanically minded elementary student who can still use some fine motor practice, definitely head to your local hardware store and put one of these kits together.  

I would love to expand on this idea.  Can you think of anything else we could add?


You may also Like:


How to Prepare your Preschooler to Excel in Algebra and Beyond


Friday, January 9, 2015

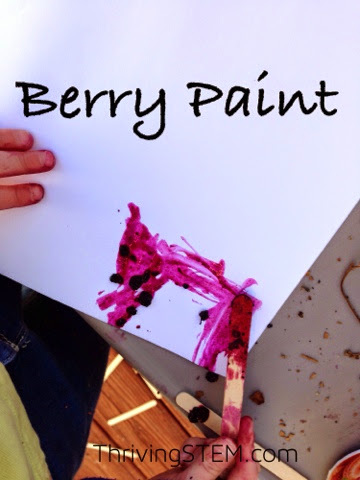
How to Paint with Berries

Don't you love art projects that use natural materials and produce a beautiful result?  Nature based art projects are a wonderful opportunity for kids to learn about  nature, practice the scientific method, and do some engineering all at the same time. Sometimes this is called STEAM, adding art to STEM. To be honest, my kids had to beg for this activity.  I was really nervous about the mess.  It was not that bad, though, especially since we worked in the back yard.

My kids loved this natural art project!! The science and engineering play are built in, for a great STEAM learning experience.

The berries we used were wild elderberries that had been growing in our backyard.  It turns out that elderberries can be used for medicine.  We decided to use ours for paint instead.  

CAUTION: If you think there is a possibility that your little artists will want to eat the paint, stick with a food edible berry like blue berries.  For our purposes, I just kept the littlest one occupied elsewhere.  Like many types of paint, ingesting this substance would be dangerous!  


My kids loved this natural art project!! The science and engineering play are built in, for a great STEAM learning experience.

Materials you will need for Painting with Berries

Berries
White paper
Sticks, pine needles or paint brushes
Plastic dish
Water
Baby wipes for clean up

The kids started by gathering some berries from this vine.  If you do not have wild berries in your yard, it would be worth purchasing a package for the sake of art and science.


My kids loved this natural art project!! The science and engineering play are built in, for a great STEAM learning experience.


This berry juice does not come off of hands easily with soap and water, but baby wipes took it off of everything!  

My kids loved this natural art project!! The science and engineering play are built in, for a great STEAM learning experience.

Once the berries were gathered, they used the stick to mash the berries. 

My kids loved this natural art project!! The science and engineering play are built in, for a great STEAM learning experience.

 They then added a little water, and more berries, and then mashed some more.  

My kids loved this natural art project!! The science and engineering play are built in, for a great STEAM learning experience.

Finally, it was time to paint!

My kids loved this natural art project!! The science and engineering play are built in, for a great STEAM learning experience.

My kids loved this natural art project!! The science and engineering play are built in, for a great STEAM learning experience.


The results were quite stunning.  The berry color was vibrant even after it had dried.  I think that we will be repeating this project.  I hope you will give it a try too!


If you enjoyed this post, consider signing up for the Thriving STEM newsletter to receive a summary of each month's activities with their corresponding objectives, and occasional coupon codes!

More Sensory Learning Ideas

Interested in a whole unit of  preschool senses learning ideas? Check out this unit that I coauthored with 11 other teacher/mom bloggers.  

Purchase 5 Sense Preschool Lesson Plans


Other posts you may enjoy:


Thursday, November 20, 2014

How to Teach Geometry through Play

Use Tinker Toys to discuss shapes with your preschooler.


We love building toys at our house.  (These particular toy were received as gifts.  No compensation was received for this post, but an affiliate link may be added.) It was no surprise that my daughter chose to play Tinker Toys on a recent morning, and it was the perfect opportunity to talk about shapes.  I wish you could see how excited she was!  Here is how you can teach geometry through play.

Play with quality building toys 


Make sure quality building toys are available to your preschoolers, and take time to sit down and play with them.  It will be good for you to go back and spend some time creating something interesting.  Your interest in working with the toys gives credibility to the child's work and opens the door for you to have future conversations.


Use Tinker Toys to Discuss shapes with your preschooler

Notice the Shapes your Child Chooses to Make


On this particular morning the Pony Artist was into triangles, so we learned about triangles.  Child led learning is always fun, and surprisingly productive.  Since she had chosen the triangles, she was ready to discuss them in detail.

Notice the Characteristics of the Shapes


Point out the attributes of the triangles by saying something like, "Look, all the sides on this triangle are the same length!"  Or ask a question like, "Do you think those sides are the same or different?"

Do you see which triangle is different in the picture below?


Use Tinker Toys to discuss shapes with your preschooler


Noticing that the triangles on the right have the same proportions even though they are different from each other set the child up for understanding that they are "similar" later.  Noticing that angle sizes and side lengths are related is useful too.  Concentrate on the exercise of noticing things.  You may find yourself pulling out facts you thought you had forgotten, and that is great!  Do not feel like you need to produce a middle school level class though.  

Encourage Combinations of Shapes


Say something like, "What happens if...?"  Try out one combination, then let the child try out whatever combinations interest her.  The understanding of how two triangles make a square goes much deeper when it is discovered on its own than when it is forced.  

Use Tinker Toys to Discuss Shapes with your Preschooler


Point out sets of shapes.  


My daughter made the two shapes below, so I suggested that we put them all together.  I asked what is the same about all of these?  What is different?  I was interested the contrast between a line, a plane and a solid.  She noticed how the the squares and circles related to one another. 


Use Tinker toys to discuss shapes with your preschooler.


Remember, it all starts with play.  Go find some great building toys and set them where your child will find them.  Better yet, take five minutes, and sit down and play with them yourself.


Other Posts You May Enjoy:
Another post about math play

Another post you may enjoy
This one talks about chaos theory!

A post about boats you may enjoy


Monday, November 3, 2014

How to Teach Algebra with Leaves

A Title photo How to Teach Algebra with Leaves


Last week, I posted a lesson idea for sharpening students understanding of multiplication and estimation using leaves.  This post is an extension of that same idea, moving it into algebra and allowing the students to get a taste of real world mathematical modeling.

Use Algebra to Analyze Leaves


Start your lesson just like I suggested in the post, How to Teach Multiplication with Leaves.   I would recommend having your students work in groups of 2-4 to accomplish these tasks.  If you are working with more advanced students, you should be able to move quickly to the point of setting up the multiplication equations to find the number of veins in each leaf.

Next, point out that rather than repeating the process for every leaf, it would be faster to make an equation that would work for every leaf, then just plug in the numbers to the equation.  Challenge your students to come up with the equation.  

You may want to have them work out some mini-equations first.
          #tiniest veins = (tiniest veins/small vein) * #small veins
         # small veins = (small veins/medium vein) * # medium veins

The mini-equations can be added together, and the final equation will look like this....
Total = (#Tiniest veins/small vein) *(#small veins) + (#small veins/medium vein) * #medium vein . . .

Of course, this equation can then be simplified.  When the equation is simplified, it becomes apparent that, mathematically, the unique feature of each leaf is the ratio of small veins to larger veins.  Each leaf can be described quickly as a unique set of numbers corresponding to these ratios.  The final step is to describe each leaf as a list of these ratios.

Real World Application


Log into a map program and pull up several maps of cities.  Include your own town, and the nearby cities best known to your students.  Ask your students to compare the highway system to that of the leaves you have just been analyzing.  If all your examples are similar to the leaves, you may want to pull up Washington D.C. as a contrast.  Washington D.C. has a traffic pattern that is radically different from the pattern seen in a tree leaf.  It also has horrible congestion, which illustrates the importance of following natures patterns.

Discuss in class, or assign a short essay on the topic:  "How should the highways and streets of a city be laid out for most efficient traffic flow?"  Ask your students to base their reasoning on the assumption that nature gives us an effective blue print for movement of large number of units, and to use actual numbers in their answers.

I hope this idea is helpful to you in engaging your students in math and making helpful connections with the natural world.  I would love to hear how it works out for you!


Other posts you may enjoy: