Effective learning for science, math, and language
Showing posts with label Preschool Science. Show all posts
Showing posts with label Preschool Science. Show all posts
Wednesday, March 8, 2017
Water play STEM activity to go with your toddler's favorite song

Saturday, March 4, 2017
DIY Flower planters: the perfect project for gardening with your toddler
How to make your own planters with your child. Planting potted flowers is a great sensory project with instant gratification. Your toddler will love this first gardening project.

My toddler is in the middle of anything I do these days, which is wonderful and exhausting. She loves to carry her own plate, although it sometimes spills. She loves hugging her baby sister, even though she sometimes responds with a scream. I want to include her, but I'm struggling to keep up with the all out of her enthusiasm.
Making these planters together was a great way to reconnect with my toddler. She loved being included, and we had instant gratification of beautiful flowers for our front step.
Thursday, November 17, 2016
How to make delicious pie from a pumpkin with your toddler
Preparing pumpkin for pie can be a fall sensory experience your children look forward to every year.

Two ambitious to preschoolers to manage, and all the traditional dishes to prepare for Thanksgiving. Other women were cooking delicious dishes from their own countries, but it fell to me to bring the traditional American Thanksgiving fare.
Saturday, September 3, 2016
20+ Captivating Preschool Science Activities

Tiny fingers grasp a piece of cereal, deliberately holding it over the floor below. The fingers part. The cereal falls. The scientist resets for another trial. You have probably seen your toddler perform this experiment. Preschoolers love doing science! I am excited share some of my preschoolers' favorite science activities.
Monday, May 4, 2015
3 Steps to a Kid Friendly Garden
I love gardening! My family always grew large gardens when I was a child. Now that I have my own kids, we garden together. One year it was basil on our seventh floor balcony, another year it was squash in flower beds at the duplex we rented. Every year my children look forward to being involved and learn something new.
This year I was envisioning a huge, organic plot, like the one my grandpap used to grow. Then life with kids happened, and it was time to plant here in the Southeast, and I did not even have seeds! If you had wanted to do a garden for your kids this year, but it's already planting time (or a little past!) where you are, don't give up! There is still time to harvest the benefits of gardening with your children. Just follow these three easy steps.

What is a kid friendly garden?
A kid friendly garden is a space with growing plants where children are welcome. It can have special features, or it can just have plants. Children are naturally drawn to growing things, as long as we make the space safe and allow them to participate, the garden is naturally kid friendly.
Step one to a kid friendly garden: go shopping
Now, if you are a seasoned gardener, or have plenty of time, it is better to make some plans. If that is you, check out what Evelyne at Nemsock farms has to say. However, if you are like me this year, and just want a great learning experience, grab the kids and head to the local hardware store.

Shopping list if you have dirt to plant in
Seeds, 1 packet per 3 square feet or 1 square meter you intend to plant
Shovel, if you don't have one already
Soil test kit, optional
Shopping list of you do not have dirt
Seeds
Dirt
Pots
Step two to a kid friendly garden: Plant the seeds
Follow the dates on the back of the seed packet the best that you can, but remember this is about the experience. Better to plant and fail than to not plant. If you are looking for more detail, check out what Nelle at Rhythms of Play has to say about working with each plant with her kids.

You may need to spend some time preparing the soil before the seeds can go in. Seasoned gardeners will spend significant time preparing the soil. In our case, my husband borrowed a rototiller from some generous neighbors and we put the seeds in. We did test the soil, record the results, and add some fertilizer. I plan to improve as we go. A kid friendly garden is all about learning.


Step three to a kid friendly garden: Watch.
The point of a kid friendly garden is to explore how to grow plants. In my case, I am new to gardening in this area, so it is a learning experience for me too. I started keeping a journal last summer to help is track how our plants are growing.
One of the main lessons we learned last summer was to protect the young plants from chipmunks until they were big enough that they wouldn't be eaten whole. This summer, we are adding to our knowledge.
See how easy gardening with kids can be? Now, grab your kids and head to the store!
Be the first to know about new curriculum from Thriving STEM and receive an organized list of new and seasonal ideas for enjoying science and math with your children by signing up for the Thriving STEM newsletter.
You may also like:


Friday, April 24, 2015
Kid made nesting supply station
Caring for the wild creatures in our own neighborhood is my favorite way to teach my children to respect the environment. The Pony Artist wanted to welcome the Robins. I did a little research, and discovered that birds may appreciate nesting supplies. Here's how she made her own nesting supply station.


If you would like to make a nesting supply station, here's what you need:
Two strips of felt
Thread
Needle scissors
Yarn (Be sure to use cotton, not synthentic, for the safety of the birds.)
First, the Pony Artist chose two strips of felt from our left over stash.

Next, she sewed the ends together. This was the most challenging part.

Now it was time to prepare the actual supplies. She chose some yarn and some string she thought the birds would like and snipped it into pieces.

She put it in the holder, and we tied it to a tree branch.

It was emptied quickly and my husband thought it looked like the birds were trying to take the holder too!
This was a fun project that gave us a great opportunity to discuss the specific needs of the birds living in our neighborhood. Of course, we got some fine motor work in as well. If you have some extra felt and yarn on hand, why not welcome the birds by providing some nice soft lining for their nests?
Several bloggers have been working on using up our craft stash by making up learning activities with things we have on hand. You can check out the other Learn with your craft stash projects here.
Be the first to know about new curriculum from Thriving STEM and receive an organized list of new and seasonal ideas for enjoying science and math with your children by signing up for the Thriving STEM newsletter.
You may also like these posts:


Be the first to know about new curriculum from Thriving STEM and receive an organized list of new and seasonal ideas for enjoying science and math with your children by signing up for the Thriving STEM newsletter.
You may also like these posts:
Friday, January 9, 2015
How to Paint with Berries
Don't you love art projects that use natural materials and produce a beautiful result? Nature based art projects are a wonderful opportunity for kids to learn about nature, practice the scientific method, and do some engineering all at the same time. Sometimes this is called STEAM, adding art to STEM. To be honest, my kids had to beg for this activity. I was really nervous about the mess. It was not that bad, though, especially since we worked in the back yard.

The berries we used were wild elderberries that had been growing in our backyard. It turns out that elderberries can be used for medicine. We decided to use ours for paint instead.
CAUTION: If you think there is a possibility that your little artists will want to eat the paint, stick with a food edible berry like blue berries. For our purposes, I just kept the littlest one occupied elsewhere. Like many types of paint, ingesting this substance would be dangerous!
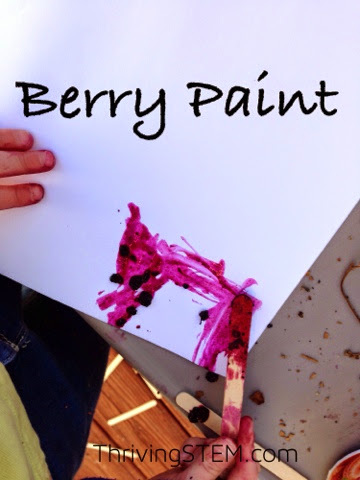
Materials you will need for Painting with Berries
Berries
White paper
Sticks, pine needles or paint brushes
Plastic dish
Water
Baby wipes for clean up
The kids started by gathering some berries from this vine. If you do not have wild berries in your yard, it would be worth purchasing a package for the sake of art and science.

This berry juice does not come off of hands easily with soap and water, but baby wipes took it off of everything!

Once the berries were gathered, they used the stick to mash the berries.

They then added a little water, and more berries, and then mashed some more.

Finally, it was time to paint!


The results were quite stunning. The berry color was vibrant even after it had dried. I think that we will be repeating this project. I hope you will give it a try too!
If you enjoyed this post, consider signing up for the Thriving STEM newsletter to receive a summary of each month's activities with their corresponding objectives, and occasional coupon codes!
More Sensory Learning Ideas
Interested in a whole unit of preschool senses learning ideas? Check out this unit that I coauthored with 11 other teacher/mom bloggers.
Purchase 5 Sense Preschool Lesson Plans
Other posts you may enjoy:


Monday, December 15, 2014
The Classic Winter Time Experiment Every Kid Should Do (At Least Once!)
Winter time is a wonderful time of year to enjoy with children, especially preschoolers. It can also be the time of year when parents could use a few extra activities in their repertoire! Today, I have a classic winter science experiment for you, one every kid should try at least once. This experiment involves snow, and we are hoping to get some. However, if snow is the rarity for you that it is for us, you can always substitute ice.

Let your preschooler get some snow
My kids are always eager to do this part. Again, if you do not expect to get snow, use ice.
Make a hypothesis about how snow melts
We actually did this experiment for the first time after my preschooler made a hypothesis about how snow melts. "I think pouring water on snow will make it melt." Now, before you judge, we live in the South where some adults believe this myth too. The results can be tragic for their windshields!
Set up your experiment
Set up one container of snow in the circumstance that your child believes will melt the snow, and one in the opposite circumstance. You may also want to set up one trial of each type in the freezer, and one outside of the freezer. (Wink!)

Check out your results
Let your child check the results. Talk about what you see. Use the terms "liquid snow" and "solid snow." You might encourage them to draw a journal about their experiences.

My daughter saw these pictures from last year as I was prepping this post. She immediately asked, "If we could please do that experiment again?" It is always a treat to re-enjoy these simple activities with an excited preschooler!
Once your child gets bored repeating this activity, challenge them to find new ways to melt the snow, or measure the volume and mass to see if they are the same very time. Do you know exactly what temperature is the melting point for snow?
If you decide to try this experiment, I would love to hear what your preschooler decides to try! Leave their ideas in the comments or on our facebook page. Who knows, maybe you will discover a new way to melt snow!

This post is part of a blog hop hosted by Preschool POWOL Packets. Each day a different blogger will share one fantastic winter time fun idea for preschoolers. Be sure to check in for another great Preschool Winter Fun idea tomorrow!
Other Posts You May Enjoy:


 |
| I Spy: An Echo Chamber! |
Saturday, December 6, 2014
Ocean habitat lesson that your children will love
The other day the Pony Artist found a box of shells I had been saving. She spent most of an hour just looking, then announced that she had thought of a great activity to share with you! The result was an amazing sensory play set. Here's how you can set up this lesson for your kids as well.

(This post does not include affiliate links as originally written, but I may add them in the future.)
Monday, October 20, 2014
Three Ways to See Animals Without a Zoo
Last week, my child wanted to see a turtle. Our city, like many, does not have a zoo of its own. We did see some turtles though! Traveling to the zoo is definitely worth the effort, but not an every day excursion. Here are three ways we can all make opportunities for our children to develop their love of nature by watching animals.

Hang out out of doors
If you have a yard of your own, pay attention to who shares it with you. Consider adding habitat and food sources that will attract and support insects, birds, and other creatures of interest. The National Wildlife Federation has some good information on making your yard into a habitat. The turtle above actually showed up in our yard one Sunday.
Even if you do not have your own yard, you can sight animals in the wild. Find a quiet corner of the park and sit still and quiet for ten to twenty minutes. Keep your eyes open as you ride down the trail. You might be surprised at what creatures you can sight even in major cities.
Visit a Pet Shop
This is how we found turtles to watch last week. The great home town business we visited actually keeps a few animals just for display.

We have visited several shops over the years, and staff have always seemed pleased to let children wander and gawk.
Watch videos on-line
When we lived in the Middle East we did not go anywhere much. I would ask what my children wanted to learn and find videos about it. If you are stuck in doors or want to see something particularly exotic, videos a great free way to watch animals from home. National Geographic and Animal Planet have good You-tube channels, but be sure to do your own search too. There are some fantastic amateur videos out there that give your child the opportunity to simply observe animals in their natural habitats.
If we want children to take good care of nature, we must give them the opportunity to fall in love with it. Simply making time to observe creates that opportunity. How are you going to see some animals today?
You may also like:
 |
| How to Attract Butterflies: Finding the Question |

 |
| Easy Windsock Project for Kids |
Wednesday, October 8, 2014
Do It Yourselves Pretend Pony Barn

Each month we enjoy participating in the Recycle!Create! challenge. I have found this project to be a perfect opportunity to encourage my children to build their engineering skills.

When I asked the Pony Artist what she wanted to make from food containers, her response was immediate: "A barn for my ponies!"
First, she chose her materials from the recycling bin.

Next, she removed the top, and one end of each box. Notice the scissor practice.
The Pony Artist says the barn looks better this way, and I would say removing the top makes play easier.

I helped her paint. She chose bright colors for the walls, dark back walls, and straw like floors.


A few days later, after the paint was dry, we added pine straw to make the ponies comfortable. But, "Not too much, because it makes the baby uncomfortable."


It was a great chance to discuss what kind of environments are best for horses. Understanding the needs of living organisms is perfect preschool level habitat study.

Each pony has its own job in the pony family, and I was treated to a long short story. The daddy fights for the whole family. The big sister only fights for the baby.

Do you have an idea for using food containers to do a project with or for your children?Share in the comments, or link it up!
Subscribe to:
Posts (Atom)